Best Sequence Setting for Mobile Footage In Adobe Premiere Pro

 In Adobe Premiere Pro how to select the best mobile footage sequence setting for better editing performance, if you use this setting then look how your editing performance increase gradually


Best Sequence Setting for Mobile Footage In Adobe Premiere Pro


Best Sequence Setting for Mobile Footage In Adobe Premiere Pro


Adobe Premiere Pro has lots of sequence setting for cameras footages preset like ARRI, AVC Intra, AVCHD, Canon XF MPEG2 and more  but it does not have mobile footage sequence preset now your think adobe premiere Pro have Mobile and Device sequence setting yes has but it's not working on your mobile footage because it has 15 fps pixel Aspect Ratio is a square ratio (1:0) all this stuff not working for mobile footage 


Import your mobile footage in Adobe Premiere Pro now you can see the import video in the project that you has created 

Mobile footage from a  sequence clip


In Adobe Premiere Pro timeline touches a line while dragging the video on the timeline the line color may be red, yellow, and green whats the mean of these lines the red line explains the video you dragging in the timeline does not match the sequence.

Red line in timeline of Adobe Premiere Pro


 yellow line express the footage you drag in the timeline that sequence match to the footage and these are the good indication for fast editing workflow 

Yellow line In Adobe Premiere Pro


and green line represent render done of your footage in the timeline 


Green Line in Adobe Premiere Pro


Right-click on the video then a new pop up open you can see the New sequence from Clip 


New Sequence From the clip of Adobe Promiere Pro


then done your sequence is ready for editing 


Best Sequence Setting for Mobile Footage In Adobe Premiere Pro


Why this setting is more important  


Adobe Premiere Pro gave you lots of sequence setting but these are not matched to mobile footages because adobe premiere pro not suitable for low mobile footages so we created a new sequence from our footage 

This way of creating a new sequence for your mobile footage that's too great and I am sure on it, use this trick for mobile footage and edit fast 

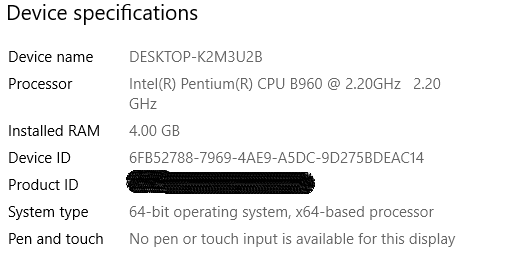
In above footage has a mobile shooted video of Samsung M11 and its work in my adobe premiere pro of pc specification is very low with RAM 4GB if I am editing video with this low laptop by using this trick then you also edit fast

Remove Background Noise From Mobile Recorded Audio In Adobe Premiere Pro

 Remove background noise from mobile recorded audio in Adobe Premiere Pro is a simple way just by edit small thing

Adobe Premiere Pro has this effect free in the software no extra plugin needs to remove the background noise follow steps by steps then without skipping a point 


Remove Background Noise From Mobile Recorded Audio In Adobe Premiere Pro


Remove Background Noise in Adobe Premiere Pro


Mobile Recorded audio capture more noise as per the mic recorded audio for instance if you record any audio or shooted video outdoor everything is good in the shooting but mobile capture audio with background noise this everything happened with beginners mobile videographer because I suffer from this type of issue but don't worry editing fixed it 


Its time to Edit Video


Import all footages in the Premiere pro and make  the new sequence from it then edit footages after all done then now time to edit audio I mean to say the topic name of the blog is to remove background noise 

Adobe Premiere Pro Remove Background Noise


  • In the Effects Panel of the search bar tab search it Adaptive Noise Reduction  


Adaptive Noise Reduction 


  • Then Adaptive Noise Reduction effects drag to the timeline 
          In timeline which audio have required to remove background noise then adaptive noise reduction effects drag on to it
  

Timeline In Adobe Premiere pro


  • Now you can see these effects in the control panel 


Adaptive Noise Reduction In Premiere Pro

  • In the Control panel, Adaptive Noise Reduction has two option to edit our audio first one is custom setup and the second one is Individual Parameter

Adaptive Noise Reduction 


  • Custom setup is our helpful tool for removing background then click on the edit tool 

Premiere pro Adaptive  noise reduction effects


  • After Click on the Edit tool comes a pop-up window open the name is clip Fx Editor-Adaptive Noise Reduction

Adaptive Noise reduction in premiere pro


  • This Clip FX Editor -Adaptive Noise Reduction is a little bit had to understand for beginners but don't worry next point make it esier

  • Select preset whereas default then three preset has first DeReverb single Source second Light Noise Reduction last Heavy Noise Reduction then click on Heavy Noise Reduction 


Adaptive Noise Reduction in Adobe premiere pro cc


  • After selecting Heavy Noise Reduction then no needs to edit audio manually 

Adaptive noise reduction lin premiere pro cc

These Effects help more to remove background noise from mobile recorded audio now you take a risk to shoot video in outdoor through mobile because a tool can easily remove background noise has to name is Adaptive Noise Reduction

Download Special 100 Free Transition For Adobe Premiere Pro

special 100 Free Transition For Adobe Premiere Pro use it anywhere,

download this pack of 100 transitions for Adobe premiere pro to create better video

Transition use in the video your creativity shows. Editing matters more in video production just puts idea and use transition really its mattes more 


Special 100 Free Transition For Adobe Premiere Pro

Download 100 Free Transition of Adobe Premiere Pro


The main purpose of using the transition to creates a video in awesome for the audience. Transition is the connection of two video footage means that two videos put together to convey storytelling and a particular mood, another point of view, time telling forward and backward. This is the point every editor uses in the video.


Type of Transition Use In Video


We talk about the type of transition use in the video its not matter lots of type of transition but the main things how you use it in the video.

Download Free 100 Transition of Adobe Premiere Pro from the given links 

Click the download links this download transition pack has a zip file if you know about zip file then skip it these two points 

  • Download Pack from links
  • Extract this download file and you can see the preset of 100 transition 

List Of Transition Of Adobe Premiere Pro


  • Distortion Transition
  • Filmstrip Transition
  • Glass Transition
  • Shake Transition
  • Glitch Transition
  • Skew Transition
  • Split Transition
  • Stretch Transition
  • Trippy Transition
  • Zoom Transition


How to Add This 100 Transition preset in Adobe Premiere Pro 


Adobe Premiere Pro import transition is the simplest way 

Lets how to add presets in Premiere pro

  • Starts Adobe Premiere Pro then you see the different panel in the software video panel, source panel, control panel, timeline, effects, media browser, or more 
  • go on to the effects panel 
how to import preset in Premiere pro
How to Import Preset in Premiere Pro


  • click the effects panel three-line menu  option
  • Click Import Preset 
Import New preset in premiere pro


  • select the file where you download this free 100 transition 
Import preset in Premiere Pro 


  • Now your file into Premiere Pro
Import new preset in Premiere Pro


That's all guys lets use this free transition in your video and create the best video for Youtube or Instagram

Title of the document

Free Download 100 Transition of Adobe Premiere Pro

Click here

Cinematic Title Assets For Free Download || Adobe Premiere Pro and Filmora

 Cinematic Title assets for Free download to use in adobe premiere pro  and Filmora no extra plugins and element for edit it everything in the package just downloads


Cinematic Title Assets For Free Use || Adobe Premiere Pro and Filmora


free Download Cinematic title assets


How to create a cinematic title for a video which font use, what thing must have to edit, the position of the title, length, breadth, height is the main thing in the editing of cinematic title 

Step By Step How to Edit Cinematic Title 


First is the Font, which font used to create cinematic title looks better
some are example Arial, Roboto, TW sen MT, Berlin sens FB, Brusher, Agent FB. These Font available in Adobe premiere pro, Filmora if it doesn't have then downloaded For free from 
Arial Font
Roboto Font
TW Sen MT font
Berlin Sen FB
Brusher Font
Agent FB Font

For Adobe Premiere Pro 


In Premiere Pro very simple editing needs to create the cinematic title scale the tool, position tool, masking tool, effects panel many tools has drop tool one is.

cinematic title in the different video like travel video or vlog video cinematic title has different title animation, color, position, masking these things you must to know while editing 

The cinematic title for a short film has a different cinematic title required additional element more matters for editing short film cinematic title editing

If you purchased this type of element from the website then you need to pay lots of money but here you get it free use it and create the cinematic title for a short film or any type of video 

Premiere pro have bigger tools option but the main is that how it uses
download below particle video, leaks, flare, looping particle, spark, and the cinematic template on video

For Filmora 

Filmora is the video editing software for a beginner. in Filmora  title option, presets, animation of the title but Filmora has lots of  different type of titles

In cinematic title editing which title selected their animation, these are more important in it. A Youtube video below which title and animation have while creating it first watch this video


Check camera lens must buy


one by one take it, main is the black video taken then all videos from which give in downloading the package what's in the package a flare lens, particle, spark, looping particle...

Filmora has no adjustment layer video for cropping at the bottom and top but the below templet use directly on any video which you want to keeps the cinematic bar  

Note- Filmora cropping has good but keeping cinematic bar then don't use cropping video at the top and bottom 


 Download cinematic title assets for free of Adobe premiere pro and Filmora use your idea and create an outstanding cinematic title for the video

Cinematic title sound effects inbuilt motion of title and make awesome  


Title of the document

Free Download Cinematic Title Assets

DOWNLOAD

New Features Of Adobe Premiere Pro Version 2021

 The biggest news coming from adobe is the new features of Adobe Premiere Pro and this make all video editor a nice opportunity to create their work as much faster and easy to do it, now the how new features of Adobe Premiere Pro make faster if its perfect or good


Adobe Premiere Pro version 2021 New Features


New Features Of Adobe Premiere Pro 2021

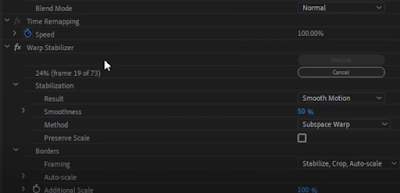
Warp Stabilizer 

Adobe Premiere Pro makes it as much Faster than previous and that very good news for video editor because the previous version of  Adobe Premiere Pro has lots of time-consuming while any footage warp Stabilizer it takes more time
now Premiere pro faster than the older version this more significant for us 
This the biggest improvement in Adobe Premiere pro of version 2021

warp stabilizer
Adobe Premiere Pro 2021 wrap stabilizer


New Caption Workflow


Adobe Premiere Pro new caption feature 


This new caption workflow features of adobe premiere pro Version 2021 feature is on the top of the adobe workspace which is the caption then here available three option which is transcribed sequence second is Create new caption track and the last one is  import caption from a file


Adobe Premiere pro new feature transcribe sequence


Click The Second option which is Create new caption from track and then a couple of option then click the plus button then look at the timeline new track is there for only add subtitle add your subtitle then customized option available for us change the font, style color shadow option, and lots of customized option another option is an export caption in SRT file of your caption


wow, you like this cool feature of Adobe Premiere Pro version 2021
Every editor wants these features and Adobe do its newest version now going to next feature is 

Text to Speech Caption 

The features of adobe are transcribed is text to speech click it and choose the language of you to have video then click ok, it takes few minutes then your speech is ready also have an edit option 
and speaker name also you can change 

I sure these features of adobe premiere pro version 2021 save your time but the feature so cool a personally love it 


Replace Media in MOGRT Files

MOGRT file of after effect you can use it in premiere pro and you want to change new video in MOGRT file then don't need to go into after-effects you can directly change media file in premiere pro what is MOGRT file is a file which you edit motion graphics template in after effect 

Audio track Mixer


Adobe Premiere Pro audio track mixer feature


The feature of Premiere pro audio track is to copy audio effects and past in new audio channel that a cool effects it makes nice edition for us easy and fast 
Audio track mixer has the new option is Pre Fader and Post Fader for audio  this generally has in music composing software but we see in Adobe Premiere Pro version 2021 

Quick Export 

Adobe Premiere Pro feature quick export button


These really nice features added to Adobe Premiere Pro quick Export are directly export video without going in the main panel of Adobe Premiere Pro here also have the option to save our presets to click it and export 

Adobe Premiere Pro quick export setting


That all-new features of Adobe Premiere Pro version 2021 may you like that comment down below if its helpful or not 
Are these features make you happier than the older version? 

8 Hiden Features in Adobe Premiere Pro you didn't know it before

 8 Hiden features of Adobe Premiere Pro you should know about it. This feature makes you work as much faster as you want also increase your knowledge and corporate with client and partners then without hold the words one by one 8 features below 


*8 Hiden Features In Premiere Pro Cc


8 Hiden features of Adobe Premiere Pro 

 Now, let's get started with Premiere feature number one which you didn't know about before and that is an audio effect called.

Download Adobe Premiere Pro CC To be Creative 

Loudness Radar


 "Loudness Radar". But instead of applying this to a clip, we're going to apply it from the effects rack in the audio track mixer. Then go to "Special" and from there "Loudness Radar". Double click on it and let's first explore the settings. 
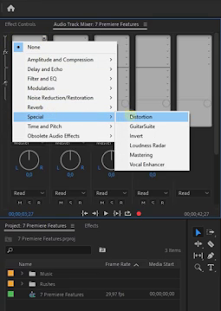


laudness radar
New Feature of adobe premiere pro loudness radar

You want to set the target loudness to -16 which is ideal for the web or YouTube. And the speed, you can set that to one minute. So when we go back to the Radar, an entire rotation is one minute of playback. So let's playback the timeline. The radar will visualize the loudness of that playback.


 Now, where it peaks into the yellow we know to mix down the volume in those parts. It's also very useful to see a difference between the two recordings. If one is louder than the other we will instantly see that in the Loudness Radar So you can kind of see this as a vectorscope or waveform but then for audio.
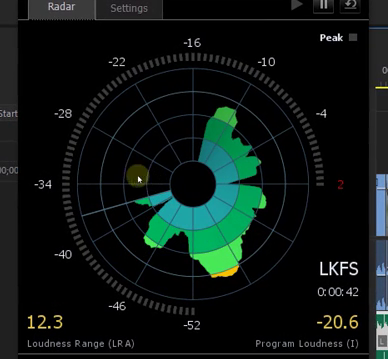

laudness radar premiere pro features
loudness radar


Import Project as a shortcut?


Feature number two We all know that we can import an existing project file into Premiere but did you know that you can also choose to import this as a shortcut? 


Well, this basically creates a shortcut in your project to another project. You can open that up and browse through it. Now, Adobe has a suggested workflow where you can create one project that is called the "Master Project". 

Then you would create a new project in which you collect and organize all of your media. You create another project in which you have all the interviews and short films. Another one with all the title sequences and so on. So you create shortcuts in your master project for all those projects and this gives you an overview and you can easily jump between the different projects.
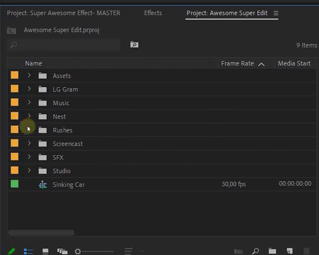

New features of adobe premiere pro
Master Project in Adobe Premiere pro


Productions:-


Now, in a recent update of Premiere, they have introduced "Productions" which is kind of similar. You start by creating a production that opens up a new production panel and here we create new projects and organize them in a way that we want. So, this replaces that master project idea as it comes down to basically the same thing. 

Adobe Premiere Pro-New features Production


Now, my guess is that they want to build more features around this which I really appreciate.


Project Locking:-


 About larger projects and organizations did you know that there are various collaboration features? Yes, even if you don't have the team's plan. In your preferences under "Collaboration," You can find the option "Project Locking". Enable that and type in your name.

Adobe Premiere Pro-New features Project Locking


 If someone else in your network is working inside a project that is part of a production you can see that person's name next to it, but it also works with shortcut projects.
Only here we have to right-click on the columns first then go to "Metadata Display" and search for "Project Locked".
 Enable it and press OK.

 That column now also appears in the Project panel and you get an overview of who is working on
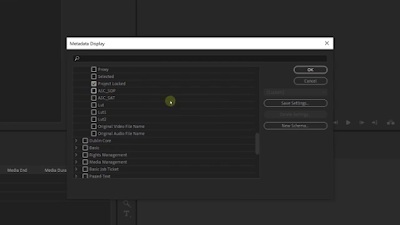

Adobe Premiere pro features
Adobe Premiere Pro-New features Project Locking


Adobe premiere Pro new features
Adobe Premiere Pro-New features Project Locking


which project. When I lock the project again Premiere will refresh. So a very nice feature if you're working in teams. you know What else is a super nice feature?


Metadata Display:-


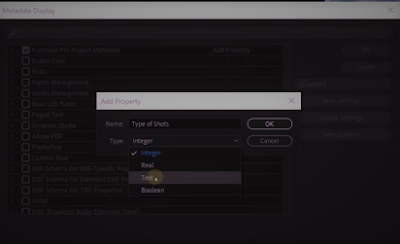
 let's continue with some more features in Adobe Premiere Pro. And as we previously saw by right-clicking in the project panels columns you can choose "Metadata Display", we can then toggle different columns but there's an interesting feature right here, you can also create your own Metadata. Simply click on "Add Property". Give it a name and then choose the type of field it has to be. 

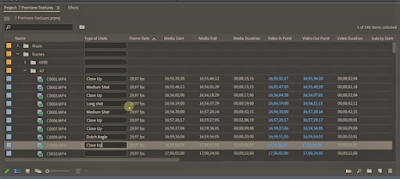
Let's take text as an example. Press Ok, and Ok again. You can now drag your new column more to the front if you like so. Now, this custom input field allows you to label your clips. 

For instance, you can say whether a clip is a close-up a medium shot or a long shot. After we've done that we can click on the column to sort our shots based on that label.


Adobe Premiere Pro-New features


Adobe Premiere Pro-New features Metadata Display


Custom Bin:-


 Moving on to the fifth feature you might not know about before and that can be found in the Effects Library. 

Adobe Premiere Pro-New features

Adobe Premiere Pro-New features custom Bin


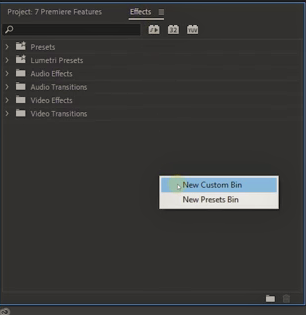
If you right-click in the empty space you can choose to create a new Custom Bin. You can give that name like "My Effects" which after you can drag in the effects that you use the most. so you can always have that folder open and have direct access to those effects without having to search for it every time.

Adobe Premiere Pro-New features Custom Bin


 A small feature but it could be very useful. The next one

An Effect:-


Say that you've made an animation on some kind of an effect.

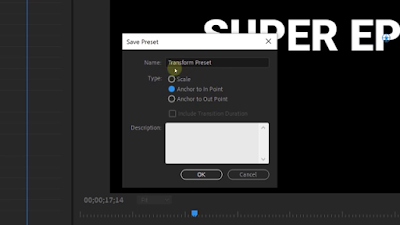
You can then save that as a preset but in the dialog box that appears you have three options to save your animation.
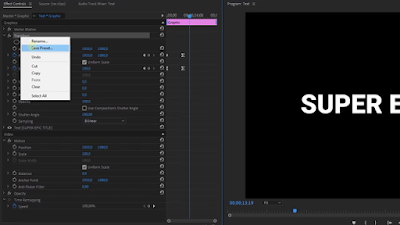
Adobe Premiere Pro- New features Save presets


And this refers to the keyframes that you've placed.

 Choosing "Scale" will see your keyframes as a percentage.


Adobe Premiere Pro-New features

Adobe Premiere Pro-New features save presets


 So when applying the presets to a much longer clip the animation will also take longer as the keyframes scale over the length of the clip.
 Because they're seen as a percentage. Now choosing in point, the animation always stays at the same speed, 
For instance, the last keyframe sits at 30% of the clip length.

starting from the in point or start the clip that you applied a preset to.

 And finally is out point which looks at the end of the clip that you created the preset from.  Applying this preset to a new clip that is longer, will start your keyframes from the time of the out point from which you've created the presets.  So, usually, you're gonna pick the endpoint or sometimes scale.


Track Keyframes Volume


 And that brings us to the last one, as we all know we can use the pen tool to create keyframes on audio clips to mix the sound, but every time that you start with a new clip you'll need to adjust there as well.

Adobe Premiere Pro New Features Track keyframe


 Well, let's have a look at the timeline. If you expand it, you'll find a keyframes menu.

From there you want to select "Track Keyframes Volume"

 and right now we can create such keyframes on the track level.

 And this also has a great benefit where you can add new or swap audio clips, without removing or breaking any of your keyframes.

You can always go back to show "Clip Keyframes" to adjust each one Individual if you like so.

And those were my seven features that you might not know about before.

At least I hope so. thank you for have you here!

Run 10x Fast Adobe Premiere Pro CC On Slow Laptop


run 10x fast adobe premiere pro cc on slow laptop


      When we use premiere pro cc in low laptop or desktop, for example, ram is 2Gb or for 4Gb graphics not good and mainly is that hard drive you well know that hard drive processing is not so good compared with a solid-state drive while you edit video in that type of laptop or computer then you face so many errors or hang below some problems you face with a slow laptop is discussed

  1.  lag while playing video 
  2. the color effect did not show properly  
  3. some effects did not play well 
  4. when some time show GPU required in the preview panel
  5. An important matter is that render time take an hours
  6. To time is taken for video exporting
  7. and so many things
The main point is that why this problem is facing while edit video in adobe premiere pro cc is that system requirement you understand it adobe premiere pro cc or version has at least requirement is 8GB ram, intel 6th gen processor or AMD FX hard drive space approximate 8GB and best is that SSD but for a beginner in the video editing profession we have no money or gears but we want to learn video editing anyhow don't worry here you come the right place for fast video editing in low laptop or computer, here share some best tips to you for video editing faster way, let us jump to tips you try your slow laptop or computer.

My laptop system has shared with you if I manage it so why can not try these tips and tricks

Run adobe in 4gb ram laptop


Focus on that point which shares here this point matter you, if you really want to be run faster adobe premiere pro cc slow laptop.

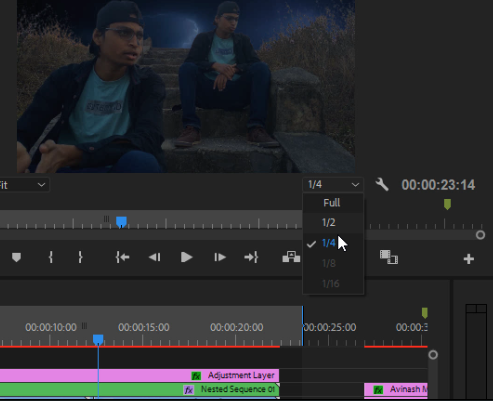
Tips first is that playback quality check if it is high then video play in lag means that played is leaves the frame and video effects not show you properly then the solution is that set it lowest value, for instance, is 1\2,1\4, 1\6, 1\8 last is 1\16. you see in the below image.

adobe premiere pro cc
playback quality in slow pc


if your video has to large-quality then you must encode it first and then you edit what I am saying that because if edit high-quality video in low pc then it slow because adobe premiere pro cc has background some coding running then high-quality video import in the timeline so definitely it runs slow solution is encode it first and with using third-party applications and then edit it, now you have arisen some question why it required that if video size has 1GB or less you need to reduce it approximately 100MB or up to 200MB you well-known size less pc run fast.


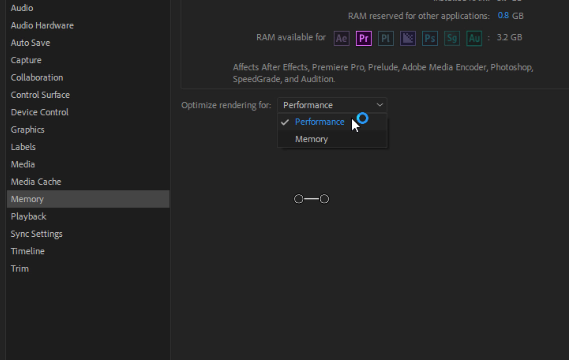
try to edit videos of 1080p and 720p quality video if you edit 4k video in slow pc so sure pc lag or sometimes crash. go in preference setting then click memory setting choose only performance don't choose memory, ok these tips help you lot


adobe premiere pro cc 2021
optimizing rendering setting in adobe premiere pro


It time to come on pro tips which are that upgrade your pc 2Gb to 4Gb, 4Gb to 8Gb, or more you have to do it, in my opinion, upgrade it to above 8Gb is enough but budget best is 16Gb. the real fact is that slow means slow no one you give money for upgrading and telling those things that I have shared with you.


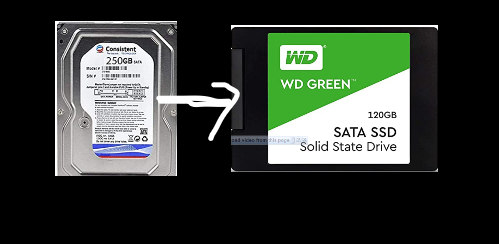
last tips for you upgrade hard drive to solid-state drive it is 10X faster than the hard drive bootup window and gaming, editing which you help more really trust me but it is very expensive if install SSD in slow laptop editing boost, laptop speed up    

hard drive to solid state drive
HHD to SSD 
Adobe premiere pro cc is a professional software for video editing if your skill upgrade on it then you become a professional video editor.

20 Free LUTs for Color Grading In Premiere Pro CC 2021

 20 free LUTs for video Editing your next project Every editor has to complete their work and then the final part has to finish which is color grading it is the most important part, you know that very well.


Color grading has improved your film and youtube video or any video that the main reason to take it better looks because of lightning, shades, the proper look of face our video/film to maintain.

If you are new to video Editing then tell you that Luts are ready to color grade on your film and video quickly that help you to save time. These luts are created by the professional colorist, therefore, we no need to spend time for a professional look at the footage.

Why is color grading is an essential part of video editing? footage never daw file which you shoot from either from mobile or camera shoot both footages has daw. Color grading telling you which film telling you a sensation emotion what exact meaning is telling emotion to viewers if the story of the '90s then color looks like the old, story is futuristic then color like new, cinematic soft.

Simple tips for color grading:

Mobile videography has low quality compared to  DLSR camera pixel low, blurriness in the footage. Mobile footage in night mode has so dark, impure, small dots in the footage. If you have a DLSR camera no dought you upload to where you want to but the mobile video has not to ready without coloring in it then done it as we want.

Tips are if you look minutely at your footages before coloring has faded in them. This fade kill footage color then we need to enhance it.

Black keeps it to  

Download 20 Adobe premiere pro cc luts