Best Shooting Tricks and Tips on Green Screen and Blue Screen

 Green Screen and Blue Screen Tricks and Tips

Here are some tips for using a green screen and blue effectively:

Remove green screen from video and shooting tips


Make sure the green screen and blue screen is evenly lit. This will help to ensure that there are no shadows or uneven areas on the screen.

Use a high-quality green screen and blue screen material. A wrinkle-resistant screen will give you a smoother key and make it easier to remove the green and blue screen from your footage.

Pay attention to your clothing. Avoid wearing green and blue clothing, as it will blend in with the green, blue screen and make it more difficult to key out.

Set your camera's white balance correctly. This will help to ensure that the colors in your final composite look natural.

Use a wide-angle lens to help minimize distortion around the edges of the frame.

Use a well-lit background image or video. This will help to create a seamless composite.

Use a green screen and blue screen editing software to key out the green and blue screen and composite your footage with your chosen background. Some popular options include Adobe Premiere, Final Cut Pro, and After Effects.

Use a matte to fine-tune the edges of your composite. A matte is an alpha channel that is used to define the transparent areas of an image. It can be used to soften the edges of your composite and make it look more natural.

Green screen best option to buy because its more usable in any commercial filmmakers now a days.

BUY GREEN SCREEN   BUY BLUE SCREEN

Sony Full frame Mirrorless Camera Launched in 2021-22

 Sony full-frame Mirrorless cameras launched in 2021-22?


Full frame Camera Guides


This year Sony launched cameras catering to different verticals. Alpha 1 is the flagship camera from Sony which is designed for top professionals across different genres. The camera can capture 50.1-megapixel images up to 30 frames/second without a any blackout. It comes with 5-axis IBIS, 15-stop dynamic range, fast AF system and silent shutter. The S-Cinetone colour profile and Creative Look have been included in the camera for cinematic feels. As for videos, the camera is capable of shooting 8K videos at up to 30p and 4k videos at 120p. It has received appreciation from customers.

Sony also launched Alpha 7 IV which is designed as a hybrid camera. It brings together the best of Sony imaging technologies in both photo and video to deliver high end experiences to a diverse range of customers. The camera comes with a full-frame 33-megapixel back-illuminated CMOS image sensor and is powered by a Bionz XR processor which handles quick image processing. It is also capable of shooting 4K with S-Cinetone colour grading as well as 10-bit 4:2:2 colour sampling. This gives creators a new level of freedom to capture, create and share in ways that they've never been able to before.
To leverage creators' growing creativity, Sony has introduced an interchangeable-lens camera, the Alpha ZV-E10. It is an amalgamation of versatility and excellence in the quality of an image. The camera offers user-friendly features, specifically designed for still and video, making it an ideal tool for creators looking to transition to a more advanced setup. Sony provides a complete ecosystem for consumers and is always focussed on their ever-changing needs. Innovation is at the core of Sony with new milestone.

5 Best Videography tips For Beginners

 Videography is the best key to must you have for the project to attract viewers to watch your video humorously. Professional looking is not spent more money on videography just learn it from help full website and YouTube videos.

Tips for Videography for Beginners


Grab your Equipment 

For beginners, practice videography with that gadget you have to suppose iPhone or smartphone and follow below things 

1. You Need to most back camera for better quality footage 

2. shoot your footage in landscape instead of verticle or make is cinematic

3. Turn on your grid option of camera setting that helps you most to shoot the best cinematic footage.

Turn on the overlay network on your screen, on the off chance that you have it when shooting video. This gives you a helpful aide for keeping your telephone level.


Proper lightning Arrangement 


Perhaps the greatest mystery to accomplishing proficient-looking recordings is to utilize lighting for your narrating. Arrange the lighting where you want to place that helps you in effects. The main is light is the sun keeps your project on day time 

for Instance, interview lighting how to set up both sides if you create cinematic set light proper as you thing


Discard Shaky Footage


Avoid shaky shots from editing footage its looks to be seasick. Fixed your camera on a tripod or use a gimbal.

When your camera is set up, do whatever it takes not to move your camera except if you need to. At the point when you do need to begin panning or zooming, treat your camera as a full mug of espresso. Keep your speed reliable and don't 


Master in Editing


When you shoot your project so a scene can be shot from different angles at the time of editing shot you have choices for adding the best shot in the final cut.

This will save you time and exertion that you may some way or another spend on refilming. Also, it will keep you from agreeing to below-average shots that will make your work look unprofessional.


Make Cinematic


There are pro tips for all videographers is the use of the cinematic technique.

Tell the audience through the cinematic technique about your storytelling it helps you to grab more viewers and You would rather not exaggerate them and wind up overpowering your watchers with the visuals rather than with your story.

Create YouTube videos without Camera or faceless video

                 Faceless Video for YouTube

Faceless youtube video for beginner youtubers


 Are you wondering how to make youtube videos without showing your face yes it is possible and yes it can work on youtube in this article we'll show you how to do it and the best faceless video ideas that you can use to easily create new videos without appearing on camera okay so this is a topic that we get asked about quite a lot and while there are definitely benefits of appearing on camera it's certainly not a requirement and there's plenty of examples of successful faceless YouTubers who use a lot of the ideas that we're covering off in this blog so whether you're camera shy or you're just looking for ways to streamline your video creation this article has everything you'll need now with all of the options we're going to cover you're not just limited to just one in any video you can easily incorporate a mix of a few or all of these into your videos to keep your viewers engaged so I definitely suggest sticking around to the end so that you know what tools you have available so


                                B-Roll Footage 

 Option number one is to capture and record b-roll footage and to use that as your primary video footage in a video like this one that you're watching here now where I am talking to a camera that's typically known as your a-roll your primary footage and your b-roll would be any additional footage to help your viewer understand or to follow along with the video so you don't need to be in your video you don't need to be presenting or speaking in your video you can literally just demonstrate what it is you're doing demonstrate a process show how something is done make something so it could be that you're still filming your entire body it could be that you're filming your hands making something or doing something but essentially here you're filming a process without needing to present or talk to the camera

Screen Recording 

 option number two is to create a screen recording you can easily record your computer screen or your phone screen your iPad or tablet screen and use that to create an engaging video so this one again is going to be great for creating a tutorial or talking through a process literally showing where you're clicking or tapping on your device so that your viewers can follow along this method is also great for creating gaming videos as well literally anything where you can show your phone screen or your computer screen that your viewer can follow along with or be entertained by now in terms of how you create videos, for instance, how you screen record your mac your pc your iPhone or your android device we've youtube video just search "how to create screen recording in PC or mobile"  that will help you with all of those

 Stock Footage

option number three is to use stock footage you don't need to go and film everything yourself there are amazing services out there that offer libraries of content you can download and use to create videos with now there are lots of different stock footage archives out there some of them free( free stock footage) some of them pay some of them worth your time and others you'll want to stay well clear of 

Slide Presentation


 so option number four is to use slide presentations think powerpoint or keynote presentations but to use them as an actual video as well now in terms of creating videos from your powerpoint or keynote presentations both powerpoint and keynote do have the ability to record your presentations and let you save out a movie file with them so it could be that you're creating an entire video just using those programs or you can save those videos out from those applications and then put it into your editing software to add extra graphic elements titles and those sorts of things to create a more engaging video but the best way i found to really level up your slide presentations is to use templates for your slides from places like envato they've got some great templates in there and some of them have some really cool animations and things as well all again to help you create a much more effective video or presentation so you don't need to start from scratch or just use the built-in templates that everybody uses there are some amazing ones you can download install customize up and really create something amazing quick and easily starting with a template from a service like envato 

Text Animation 


option number five is to use text on screen so this could be depending on the video that you might have every single word for word written out as text on screen to match up with a voice over or a narration that you've got or it could be just to bring up key points that you're covering off in your video so this doesn't mean that you need to have a voiceover or a narration there are some really effective videos there's literally just music and text written on screen now in terms of creating these you could manually type everything out word by word and you could do that if it's a relatively short video for longer videos where there's a lot of text i definitely recommend using some sort of auto transcribing service like rev they've got an awesome ai option which is cheap or they've also got a human option where an actual human is going to go through and type out your voice over your narration for you and give you back a text document the human way is definitely more accurate but once you've got that transcript of your voice over or your narration back then you can easily add that text into your editing software either by manually copying and pasting the text or a lot of video editing software now will let you import a subtitle file which rev will give you now in terms of other ways that you can do this there's other desktop applications like dscript and kapwing both of these will automatically transcribe or type out your text for you and they'll also help you customize up your titles and text and change the look and feel of them and save out a video all in the one app another great 


Title Template

option for creating this type of video is to use title templates you can customize up and use animations and things to really create professional-looking titles so this is another one where video hive from Envato really stands out with templates you can download customize up and use in your videos or also place it will actually let you use all of their templates and customize them up there live on the screen so that you can either download a complete video from the place it or you can download it and still use it in your editing application or software as well no matter which way you go creating videos where you do have text on the screen this is a perfect example of where it doesn't just need to be text on screen you might move the text over to the side to help emphasize any key points or to show other things on the screen at the same time 

Animations

number six is to use animations so it could be that you're creating a video where you've got those whiteboard drawing style animations or you might even have animated characters like a cartoon and these videos are actually surprisingly much easier than you think to create there's great services like doodly and animaker that make both of those types of videos really really easy for you to create or you can always find an animator on places like fiver and upwork and commissioned them to do the work for you relatively cheaply and again there's some really big channels out there and the videos that they're creating are just animations option number seven is to use animated photos and graphics so these days in most video editing software and apps it's really easy to drop in all of your photos or your graphics to apply some simple effects to add the ken burns effect or a slow zoom in or a slow pan to then easily add some transitions between the different graphics so they flow smoothly and that they create more engagement but there's also some really cool apps and tools out there right now to help you take this to the next level like cap cut for instance it's got this amazing 3d photo effect that you can literally drag and drop onto your clips and it will create a 3d motion effect from your photos so this type of effect used to take a long time to go and build out in software like adobe after effects so it's so awesome that you've now literally got a drag and drop effect in cap cut but also in other video editing apps and tools as well to help you do this really really quickly and the other way that you can create some really amazing videos just from your photos or graphics is again to use templates from video hive and playset there's a ton of awesome templates that you can download you can customize up with your own photos your own graphics your own video files and it's going to tie them all together and it's going to make them look awesome and again if you're not using more professional video editing software then that's where playset will let you customize all of that up upload your own photos and graphics and videos all to their website and build out your template and your video just on their website now both video hive and place it have templates that start under 10 but they've also both got subscription options as well so that's seven different ways you can create videos all without being in them and while all of these options are great and can get you awesome results one thing to note is that showing your face on camera does help you build a rapport and a relationship with your viewers much more effectively as you grow i would definitely encourage you to explore different ways to see if this is an option for you especially if being camera shy is the main reason that you're choosing not to appear on camera i felt the same way when i first started out and honestly it does get much easier over time so now that you know how to create amazing videos without being in them 

5 Landscape photography Magical Setting

 understand deeply the landscape photography how it does and every photography should know the landscape photography is not easy to capture a picture without knowing anything. this article with title name the landscape photography 


landscape photography magical setting image source by canva.com


1.  Identify the environment of the day to go shooting otherwise you miss the photographic moment. if you shoot sun rising photography then you must stand at the place you want to capture pictures before 30 minutes of sunrise and 2 hours before sunset use the leading lines and capture the awesome picture


2. Evaluate the subject to create the most impactful image on those times of sunset and sunrise


3. Image the picture you want to capture this all easier through practice you know a quotes "Practice makes a man Perfect" just apple it on your framing this is something you can do at your adjustable place through an application, for instance, PhotoPills in the arranging stage

4. Make your composition that will support the subject. Most part in capturing the landscape photograph by using leading lines foreground, etc to make interesting pictures. achieved something best in landscape photography by using light to grab attention.

5. plan the setting, you want to focus on. use a wide-angle lens for foreground framing. it can be using a little aperture. you know most is that light changing in minutes so use advanced setting in the camera so this will be the part of time-saving 

These five tips for capturing landscape photography in sunrise and sunset may help full to you plz comment down which tips like you most 

Photography Tricks and Camera Guide

 Night photography Guide


Photography magic setting edited by canva


General Exposure Guide:

Situation in Cityscape:- Set  ISO 100 20 second at ISO 200 at 10 second, 400  at 5 second

scenes with reflection on water:- ISO 100 at 30 second, 200 at 15 second ISO 400 at 8 second

Neon signs:- ISO 100 at second 2, ISO 200 at 1 second, ISO 400 at 1/2 sec

Christmas lights(outdoor):- ISO 100 at 20 second, ISO 200 at 10 second, ISO 400 at 5 second

Average outdoor lighting (wide):- 20 second ISO 100 and 200 ISO at 10 second, ISO 400 at 5 second 

Floodit scene(outdoor):- ISO 100, 200 and 400 at 30 sec, 15 and 8 second

Landscape by full Moonlight:-  ISO 100 at 30 minutes, ISO 200 at 15 minutes and ISO 400 at 8 minutes

Landscape at twilight:- 1 minutes for ISO 100, 30 second for 200 ISO and 15 second for ISO 400 

Candlelight(indoor):- 1 minutes for 100 ISO, ISO 200 for 30 second and ISO 400 for 15 second 

Traffic light trails:- Set ISO 100 at 30 second, ISO 200 at 15 second, ISO 400 at 8 second 

Fair rides:- Set ISO 100, 200 and 400 at time 15 second, 2 second and last is 4 second

Bonfire Flames:- ISO 100 2 second, ISO 200 for 1 second and 1/2 second for ISO 400

Fireworks:- 2-60 second for ISO 100, 2-60 second ISO 200 and ISO 400 at 2-60 second 


Shutter Speed Tricks

The longer the shutter speed, the more light goes to the sense. use long speeds when there is not a lot of light, and fast speeds when you want to freeze a moment

1/4000-  Fast animals, Sports
1/2000-  Subset/Sunrise
1/1000-  Races, Extreme sports
1/500-    Slower Sports
1/250-    Casual Photography
1/120-    Panning fast cars/vehicles
1/60-      Planning Slower Objects
1/30-      Blurring Motion
1/15-      Low Light without A Flash
1/8-        Blurring Moving  Water
1/4-        Blurring Motion
1/2-        Extreme Low Light
1*-         Fireworks
5-30*-    Light Painting
Bulb -    Sky/Night time, Long Exposure

Manual Mode

1. Set Aperture 

1.2-3.5 for Bokeh and Blur
3.5-8  for Slight Blur
8-22 for Wide DOF

2. Set ISO

100 - Sunny 
400 - Cloudy
800 - Dark
3200 - Night

3. Set Shutter Speed

1/2-1/8 - Blur Motion 
1/125 - Portraits
1/250 - Freeze Motion
1/500+ Sports and Extreme Motion

Extras Tips For you
 
  • Shoot on Raw Experiment 
  • Check Histogram Watch Your Focus on Low Aperture

For Beginner 7 Basic Camera Movement

 In this post, we understand 7 basic camera movements as a beginners.

This rule is used in cinematography then video reach on top you know this, if not then how it performs or has explain in detail 

seven camera movements add depth to your project all are techniques but as a beginner doesn't  know you


For Beginner 7 Basic Camera Movement


7 basic camera angle


1. Zoom

zoom camera movement is the most used technique in cinematography, we use to add intension in character just zoom the camera toward the subject. Zoom camera movement use in your videography in different way another part is add your creativity and explore your best videography ever

2. Pan


Camera angle image edit by ashstudio


Pan camera movement is the movement of camera vertically, horizontally, up and down these are the different panning camera movement if you confuse so simply  see the below image its understand it properly.

3. Tilt


the next camera movement is tilt which is the most used camera technique in cinematography to reveal the character. In tilt movement  camera is steady in a place then change the angle up to down or down to up.

4. Truck 

 
Camera move from left to right and right to left through track this movement create additional intense in videography most of the TV serial maker apply this technique. Truck movement same as dolly movement 

5. Pedestal


pedestal camera movement fixed at one direction and move vertically up and down. pedestal camera movement most of the used with studios cameras while on interview or other show of studios.


6. Dolly


Dolly movement, the camera move forward and backward with fixed track. camera capture a beautiful shot in videography


7. Rack Focus


Ok, rack focus isn't always as a good deal of a camera flow as it's miles a method, however many novices overlook this essential ability. You alter the lens to begin an photograph blurry and then shift the focal point to make it crisper, or vice versa. It is an extremely powerful manner if you want to exchange your target audience’s focus from one problem to some other.


Must Watch 5 Best Filmmaking Youtube Channel For Beginners

you didn't know about this Youtube Channel before so never learn filmmaking ohh!... what word you say dude that the funny... 

 I love the platform of YouTube I think it's so crazy how many amazing creators there are that are constantly putting out free content for everybody watching that's entertaining and providing value

 you can learn from stuff I just think it's really really cool

 I want to give some credit to a few of my favorite channels that I watch all the time

5 Best Filmmaking Youtube channel for Biginners


I am not given money from those channels to review their channel in this post just want to share the best filmmaking which you learn from the best YouTuber if you watch these channel I definitely sure you learn something


5 Best Filmmaking Youtube Channel For Beginners


MATT D'AVELLA


Youtube Channel Matt D'Avella


The first channel must watch on youtube is  MATT D'AVELLA 

the man is cool and has nice storytelling talent who share our thought through it but professionally his minimalist, filmmaker, and documentary minimalism. This is a nice guy 


YouTube Link

                                                MATT D'AVELLA 


SARA DIETSCHY

 
Youtube channel sara dietschy

 Sara Dietschy is the channel that shares knowledge about video editing creativity, Camera review, Documentary, vlog. Their Content has high quality never disappointing. 


YouTube Link

                                         SARA DIETSCHY


ANKIT BHATIA


Youtube channel ankit bhatia


This Channel awesome cinematic vlogging channel on YouTube. Their traveling story in a cinematic way, how nice to show their vlog in a cinematic way. Ankit Bhatia also share the knowledge he put in the video 


YouTube Link

                                                          ANKIT BHATIA


Irfan Junejo


Youtube channel Irfan Junejo


The way of storytelling has very nice, Irfan Junejo Youtube channel on vlogging, describing our life in the way you understand. This channel unique content of vlogging than other vlog channels also uses the cinematic shot in the video for storytelling


YouTube Link

                                                Irfan Junejo


ANDREAS HEM


Youtube channel Andreas Hem


This channel I love so much the content he created never discard on youtube. The channel is interested in filmmaking, editing tutorial, vlog. Andreas Hem is the best channel to learn filmmaking in a different manner


YouTube Link 

                                                      ANDREAS HEM


5 Mistake Should Avoid In Filmmaking || Videography

I thought that I knew everything, that I was a great filmmaker. And oh boy, was I wrong! I knew my basics, and that's it.

 I made so many mistakes over the years but the most important thing was that I also learned from those mistakes.

 So in this blog, I want to share those mistakes so that you don't have to make them.


5 Filmmaking Mistake Should avoid


 I first like to know from you. What was your biggest filmmaking mistake? Let me know in the comments down below.

 I'm always curious about other people with whom those mistakes were. And now, without further ado,.


Tip Number One: Camera Height


Often you do pay attention to camera framing and so on, but one thing that most aspiring filmmakers forget is the height of the camera. For Example presentations or interviews, you want to have the camera at eye level. Slightly below or higher than the eye level feels weird and should be avoided unless you have a good reason for it. Going lower or higher with a camera can actually give a nice perspective, but make sure that you move the camera high or low enough so that it doesn't feel like a mistake.


 Tip number two: Backgrounds


 While we're doing all the effort and making our subject look good on camera, we often forget about the backgrounds.

 Make sure that there are no objects behind the subjects that could give a weird impression, such as a tree or a pole sticking out someone's head. Also, think about its brightness and colors.

 When your subject is wearing dark clothes and your background is also dark, then the subject will get lost in that.

 You want to get some difference, so in this example, it's better that your subject wears brighter clothes.

 And the same goes with movements. Are there distracting elements in the background that do not add to the story? Then try to avoid that.  A very simple trick to make your subject pop out is to work with blue colors in the backgrounds, as that is in contrast with skin tones.

 Now, having depth in your background separates your subject as well, as you get a more shallow depth of field. Anyways, there's a lot that you can do with the background, and it could have its own video.


Tips Number Three: Lighting


lighting, and more specific hotspots and flat lighting. When you're starting out, you'll mostly be working with existing lights. The outdoors is fairly easy,  draw an invisible line through your subjects, parallel with the camera. And now make sure that the sun is always on the other side of the line.

 This doesn't have to be straight behind the subject, it could also be on this site. This way you're creating depth, your subject won't have the sun in his eyes and you get some contrasts.

 Indoor, common mistakes are hotspots, usually from small spotlights in the ceiling. Try to avoid that them shine into the face of your subject. Again, draw that invisible line and try to get such lights behind the subject and make it function as a backlight. As for the fill lights, make sure that there is some contrast over the face. Don't put your subject right in front of a window, but instead at an angle.

 One thing you could also do is buy or create a flag, which is just a black fabric around the frame. Placing that on one side of the subject will cut away some lights creating contrasts. This technique is also called the negative fill.


 Tip number four: Camera Lock


5 filmmaking mistake 


 when you're operating a camera don't lock yourself in. When you have to take a shot of someone tying your shoes, for example, I see a lot of filmmakers sitting down and locking the camera in to make the perfect shot. In reality, you've locked yourself in.

 When your subject does something sporadic or something else unexpected, you will miss that moment, or at least your transition to it will fail.

 Unless you're doing fiction, I would always recommend taking a flexible post while making your shots. From such a pose you can smoothly bring your camera to the next action.

 And finally, I'd like to add another common mistake, which is mixing camera styles.

 An example is where you start today by filming everything from a tripod or a slider, but as the day progresses you start losing time, everyone gets tired on sets ends. A lot of the time I would see filmmakers suddenly go handheld because it goes faster.

 When you don't have a storytelling reason to suddenly change your camera style, then don't change it. Never do something because you're getting tired. You will regret that in the edit, so keep focusing and go 100% for the project until you get every shot on tape.

 This brings me to the last mistake to avoid and that is not monitoring.


Tip Number Fifth: Audio and Video


 This is for both audio and video. With audio is simple, you just plug in some headphones or earbuds and listen to the audio while it's being captured.

 Even when you see the levels move, it is still important to monitor.

 We have had it happen so many times, where a sudden crack in the audio appeared, a wind blow, or even someone's lavalier mic that came loose and now hangs somewhere in your jackets. Audio levels don't tell about such issues, only headphones can.

And the same is with video. Looking at your display is not monitoring. Use the built-in tools like histograms, zebras, exposure assistants, etc to determine whether or not your shot looks good. If you find yourself making such
mistakes often, then stick some pieces of tape to your camera with a checklist on it. 
Before every shot go over your checklist, because in the beginning, it might be too much information on your display. So only having those essentials stick to your camera could be really helpful. And those were my top five mistakes that you should avoid at all times.


21 Free Cinematic Color luts For Filmora

Filmora color luts has ready to color your video then looks video more impressive. Filmora color luts add additional value to the video. 

21 free 3d luts for filmora 


Lets me know a little bit about filmora color panel. filmora color panel has an easy interface, easy handling capability, quick responsive tool, quick show result on video while the color change in the panel and lots of improvement have for coloring video.

What is Color Luts:-

color luts none about save your time means that when we edit video for color correction time for some reason it took a long time for transformation, therefore, color luts help you for saving valuable time.

It is a useful in-camera shooted video:-

Camera filming video works this color luts yes off course it works Camera shooted video put color luts from the color panel of filmora choose browser option then select the luts which you want to add in video and see the changes for selecting before after using tools.

It is useful on Mobile shooted video:- 

The mobile shooted video has small quality pixel as per the camera shooted video but the color luts apply on it. 
The mobile shooted video come to some problem but the solution also have first to tell you that all mobile quality are not same you also satisfied this, it depends on the camera quality of mobile but camera shooed video has not any problem. Camera filming video this color luts apply tremendously. When applying color luts on the video of mobile its looks different but the problem of meaning is that mobile video look overexposed in the video panel therefore to resolve this problem is to correct its color panel manually then it sees better.

We don't have better camera quality mobile then you want to apply this luts, this color luts apply perfectly but need some correction to make it perfect every colorist said that '' use this color luts and make the video more interesting and aesthetically beautiful" but the real truth is that mobile camera video need some correction no one gives it perfect luts for the video that you shot from mobile camera 


Both video files shooted videos apply these color luts perfectly without any looses of quality of the video

List of Luts providing:-

  • Orange and Teal 4 luts
the color difference in filmora


  • Warm 2 luts 
warm luts of filmora


  • Cold 2 Luts
cold luts in filmora


  • Cine 3 luts
cine luts for filmora


  • Vibrant 2 luts
  • CineBasic 2 luts
  • Look 1 luts
  • CineBright 2 luts
  • 3 more luts


Download Filmora 21 color Luts free Directly 
This file has a Zip file after download extract it then you are shown 21 luts. Download for click here

Best Tripod Trick For your Smartphone

 Hack you should know about the mobile camera while shooting some commercial shoot at home  B-roll shot, Slow-mo shot with your pet or child. Make an interesting video using these tips.


Tripod tricks 


I'm going to share a small trick with you that I have actually learned recently and have been using quite recently in my Instagram videos now the trick is to use a tripod as a slider now how do I do this and what are the tips to get better videos.

 I'm very excited hope you are too so without wasting any time let's get started the idea of the trick is to move your tripod to create slider-like movements.  A simple tripod and a camera mounted to it I use both my hands for creating these tripod movements I use my left hand for the movement and I use my right hand for actually controlling and stabilizing the movement so there are basically two kinds of movements 

One is simple and one is conflicts now what do I mean by that let me explain so basically they are actually four types of movements one is the sideways one is where you move forward or backward now this comes under the simple category where you just have to use one hand and other hand just for stabilizing but things starts to get interesting when you use both the hands for creating the movements so you understand what  I'm creating a circle of movement I am using both my hands I am holding both the legs of the tripod and I'm moving the tripod in the circular motion with the center being the third leg of the tripod and the advantage of the tripod is you get a lot of flexibility if you are using a slider you're stuck with a one wave motion but when you are using a tripod just with a little bit of practice you can actually get very interesting movements you can also combine these movements to make it look much more interesting one additional tip is if your mobile shoots slow motion try shooting in slow motion and then you can use speed ramping to make it look even more interesting I recomnded to you shot video at 120 fps and I used speed ramping and  the video looks slightly more interesting than a static shot with no movement

 so even though you don't have a slider you can still create very interesting looking videos, I hope you enjoyed the trick and you will use it in your videos 

Another Trick is that the tripod has three lags ok, puts the tripod on a soft cloth just stand on the cloth but some condition has to do these tricks the cloth you have taken for that the surface keeps it which must be a plane surface like a marble surface, therefore, the cloth with the tripod slide smoothly backward or forward. The tripod works as a DIY slider but while using these tricks no need slider or no waste of money.   

Pull the cloth slowly backward with a little bit and push forward slowly then create a video more interesting. Using this tricks cloth and with the tripod also turn it surrounding, half turn, right turn, left turn and apply your idea into it than film video as you like to film it.

Idea mine and creativity yours then see what magic happens.

Best Camera angle || Understand to Audience

The camera angle in our filmmaking is best to look good but sometimes it not work because if your story doesn't understand to the audience then out work has no value. we really understand the camera angle which you influence the audience better knowing the storytelling of the cinematographer. 


Cinematographer expresses their story in a visual language which understands easily. which shot you covered in-camera as per the dialog in the script. Over the year cinematographer creates an understanding story behind the dialog.


camera angle
12 best camera angle 


Why Your camera angle is important in filmmaking:-


  1. Perspective
  2. Emotion
  3. Editing
  

Perspective:-


What you actually have seen in a short film to understand film multiple perspectives.
Emotion:-


Number two emotion different camera angles can help you convey different emotions.

Editing:-


 Editing your video becomes a lot easier when you have multiple angles to choose from which will ultimately help you tell a better story.

12 Camera Angle Here Discuss:-


  1. Wide shot:-


The wide shot is usually captured on a wider angle lens so as to see more of your surroundings and is more frequently used when you're wanting to establish a location so the viewer can understand where the scene is taking place wide shots can also be used to portray emotion like loneliness insignificance or feelings of being removed from the action.


2. Long Shot:-


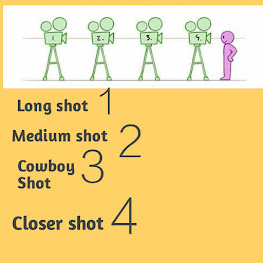
The long-shot is also used to establish location but with a bigger emphasis on your subject filling the entire frame usually showing their full-body this look is best created using a tighter focal length and shooting from a distance a medium shot is usually from the waist up and is used to help the viewer focus in on what your subject is doing or saying this shot is also great for helping the viewer feel.

long shot
camera long shot


3. Medium Shot:- 


What is the subject doing in that to show you through this camera angle? The medium shot most closely represents the distance you view people from as you're having a conversation with the cowboy shot this shot is discuss below.


4. cowboy shot:-


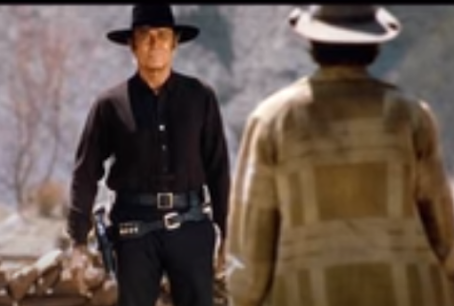
Cowboy shot is between long shot and medium shot its popular use in western films.

western cowboy shot
western film cowboy shot 


5. Tight (Close up) shot :


This shot mainly captures the subject face shot with the shoulder used mainly for dialogue or to show the detailed expression of your subject tighter shots are usually used for important or intense or intimate pieces of dialogue or action to help the viewer know that they should really pay attention to what's being said and tight shots are typically best shot on tighter focal links like around 50 to 100 millimeter.


6. Detail Extreme close up shot:-


A detail or extreme closeup shot is used to put emphasis or importance on a specific detail in your image detail shots are a great way to create mystery in-depth in a story to help draw the viewers attention to the common theme and again detail shots are typically best shot on tighter focal lengths like 50 to 100 millimeters or macro lenses.

Extreme closer shot
extreme closer shot

low angle , high angle, cowboy shot
camera position for different shot


7. Low Camera angle shot:-


The low camera angle is used to make your subject appear larger the life and to portray power and dominance low camera angles can also be made to portray Wonder and majesty as long as your subject is smaller than what surrounds them in your image. 

8. High camera angle shot:-


The high camera angle does the exact opposite by portraying your subject as weak and inferior or smaller and vulnerable.


Low, high, medium shot
low angle, high angle, and normal shot


9. Dutch Camera angle shot 


A Dutch angle is basically whenever you step on your frame and tend to be used to convey unpleasant movements like something that is not basically right to give the impression that the world is on the side of which the Dutch angles can be skillfully used to tell us something is wrong.


Dutch angle
Dutch angle 


10. Over the shoulder shot:-


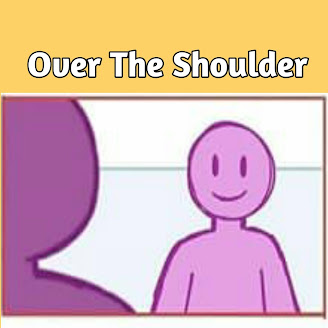
Over the shoulder, shots are exactly how they sound when you have two subjects talking to one another you put the camera behind the shoulder of one of the two placings one on the foreground giving the perspective as if you are the person that is being talked.

Over shoulder shot
conversation with a shoulder shot


11. Pov (point of view) shot:-


A POV or point of view shot depicts an angle that shows what a character is looking at this episode allows the viewer to take on the perspective of the character and begin to understand their state of mind on a more personal level this is commonly used in action or sports scenes to help give the audience the thrill of being in the driver's seat and is usually shot on a wide-angle lens so that you can see more of your surroundings.

pov shot
pov shot 


12. Cutaway shot:-


a cutaway shot is an interruption of a continuously filmed scene by inserting a view of something completely different cutaways are great to help transition to new scenes or to show side stories happening at the same time as you're the main story.


Some tips using camera angle:-


1. Be careful to use more camera angle isn't useful in every shot. 

2. Camera angle enhance your story in a better way 

3. Don't use unnecessary camera angle

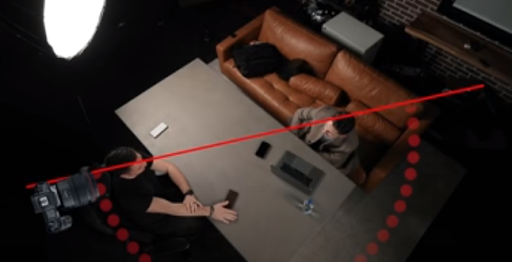
4.  The 180-degree rule is basically an invisible line that you draw in the middle of your scene and you have to make sure not to cross over the other side of that line

180 degree rule
180- degrees rule 


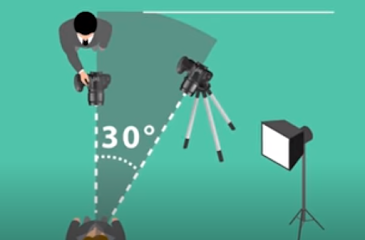
5. 30-degree rule which basically states that when cutting between two angles of the same subject like an interview of someone talking you want to make sure that our angle a and camera angle B are at least 30 degrees apart and ideally they'd also be a different type of angle like cutting from a medium shot straight in front of the subject to a tight shot by keeping this in mind it will help your angles cut together more seamlessly and professionally.

30 degree rule
30-degrees rule


 These are tips of using the camera angle you use in your story then tell me which camera angle you use most in your story?