5 Mistake Should Avoid In Filmmaking || Videography

I thought that I knew everything, that I was a great filmmaker. And oh boy, was I wrong! I knew my basics, and that's it.

 I made so many mistakes over the years but the most important thing was that I also learned from those mistakes.

 So in this blog, I want to share those mistakes so that you don't have to make them.


5 Filmmaking Mistake Should avoid


 I first like to know from you. What was your biggest filmmaking mistake? Let me know in the comments down below.

 I'm always curious about other people with whom those mistakes were. And now, without further ado,.


Tip Number One: Camera Height


Often you do pay attention to camera framing and so on, but one thing that most aspiring filmmakers forget is the height of the camera. For Example presentations or interviews, you want to have the camera at eye level. Slightly below or higher than the eye level feels weird and should be avoided unless you have a good reason for it. Going lower or higher with a camera can actually give a nice perspective, but make sure that you move the camera high or low enough so that it doesn't feel like a mistake.


 Tip number two: Backgrounds


 While we're doing all the effort and making our subject look good on camera, we often forget about the backgrounds.

 Make sure that there are no objects behind the subjects that could give a weird impression, such as a tree or a pole sticking out someone's head. Also, think about its brightness and colors.

 When your subject is wearing dark clothes and your background is also dark, then the subject will get lost in that.

 You want to get some difference, so in this example, it's better that your subject wears brighter clothes.

 And the same goes with movements. Are there distracting elements in the background that do not add to the story? Then try to avoid that.  A very simple trick to make your subject pop out is to work with blue colors in the backgrounds, as that is in contrast with skin tones.

 Now, having depth in your background separates your subject as well, as you get a more shallow depth of field. Anyways, there's a lot that you can do with the background, and it could have its own video.


Tips Number Three: Lighting


lighting, and more specific hotspots and flat lighting. When you're starting out, you'll mostly be working with existing lights. The outdoors is fairly easy,  draw an invisible line through your subjects, parallel with the camera. And now make sure that the sun is always on the other side of the line.

 This doesn't have to be straight behind the subject, it could also be on this site. This way you're creating depth, your subject won't have the sun in his eyes and you get some contrasts.

 Indoor, common mistakes are hotspots, usually from small spotlights in the ceiling. Try to avoid that them shine into the face of your subject. Again, draw that invisible line and try to get such lights behind the subject and make it function as a backlight. As for the fill lights, make sure that there is some contrast over the face. Don't put your subject right in front of a window, but instead at an angle.

 One thing you could also do is buy or create a flag, which is just a black fabric around the frame. Placing that on one side of the subject will cut away some lights creating contrasts. This technique is also called the negative fill.


 Tip number four: Camera Lock


5 filmmaking mistake 


 when you're operating a camera don't lock yourself in. When you have to take a shot of someone tying your shoes, for example, I see a lot of filmmakers sitting down and locking the camera in to make the perfect shot. In reality, you've locked yourself in.

 When your subject does something sporadic or something else unexpected, you will miss that moment, or at least your transition to it will fail.

 Unless you're doing fiction, I would always recommend taking a flexible post while making your shots. From such a pose you can smoothly bring your camera to the next action.

 And finally, I'd like to add another common mistake, which is mixing camera styles.

 An example is where you start today by filming everything from a tripod or a slider, but as the day progresses you start losing time, everyone gets tired on sets ends. A lot of the time I would see filmmakers suddenly go handheld because it goes faster.

 When you don't have a storytelling reason to suddenly change your camera style, then don't change it. Never do something because you're getting tired. You will regret that in the edit, so keep focusing and go 100% for the project until you get every shot on tape.

 This brings me to the last mistake to avoid and that is not monitoring.


Tip Number Fifth: Audio and Video


 This is for both audio and video. With audio is simple, you just plug in some headphones or earbuds and listen to the audio while it's being captured.

 Even when you see the levels move, it is still important to monitor.

 We have had it happen so many times, where a sudden crack in the audio appeared, a wind blow, or even someone's lavalier mic that came loose and now hangs somewhere in your jackets. Audio levels don't tell about such issues, only headphones can.

And the same is with video. Looking at your display is not monitoring. Use the built-in tools like histograms, zebras, exposure assistants, etc to determine whether or not your shot looks good. If you find yourself making such
mistakes often, then stick some pieces of tape to your camera with a checklist on it. 
Before every shot go over your checklist, because in the beginning, it might be too much information on your display. So only having those essentials stick to your camera could be really helpful. And those were my top five mistakes that you should avoid at all times.


Cinematic Title Assets For Free Download || Adobe Premiere Pro and Filmora

 Cinematic Title assets for Free download to use in adobe premiere pro  and Filmora no extra plugins and element for edit it everything in the package just downloads


Cinematic Title Assets For Free Use || Adobe Premiere Pro and Filmora


free Download Cinematic title assets


How to create a cinematic title for a video which font use, what thing must have to edit, the position of the title, length, breadth, height is the main thing in the editing of cinematic title 

Step By Step How to Edit Cinematic Title 


First is the Font, which font used to create cinematic title looks better
some are example Arial, Roboto, TW sen MT, Berlin sens FB, Brusher, Agent FB. These Font available in Adobe premiere pro, Filmora if it doesn't have then downloaded For free from 
Arial Font
Roboto Font
TW Sen MT font
Berlin Sen FB
Brusher Font
Agent FB Font

For Adobe Premiere Pro 


In Premiere Pro very simple editing needs to create the cinematic title scale the tool, position tool, masking tool, effects panel many tools has drop tool one is.

cinematic title in the different video like travel video or vlog video cinematic title has different title animation, color, position, masking these things you must to know while editing 

The cinematic title for a short film has a different cinematic title required additional element more matters for editing short film cinematic title editing

If you purchased this type of element from the website then you need to pay lots of money but here you get it free use it and create the cinematic title for a short film or any type of video 

Premiere pro have bigger tools option but the main is that how it uses
download below particle video, leaks, flare, looping particle, spark, and the cinematic template on video

For Filmora 

Filmora is the video editing software for a beginner. in Filmora  title option, presets, animation of the title but Filmora has lots of  different type of titles

In cinematic title editing which title selected their animation, these are more important in it. A Youtube video below which title and animation have while creating it first watch this video


Check camera lens must buy


one by one take it, main is the black video taken then all videos from which give in downloading the package what's in the package a flare lens, particle, spark, looping particle...

Filmora has no adjustment layer video for cropping at the bottom and top but the below templet use directly on any video which you want to keeps the cinematic bar  

Note- Filmora cropping has good but keeping cinematic bar then don't use cropping video at the top and bottom 


 Download cinematic title assets for free of Adobe premiere pro and Filmora use your idea and create an outstanding cinematic title for the video

Cinematic title sound effects inbuilt motion of title and make awesome  


Title of the document

Free Download Cinematic Title Assets

DOWNLOAD

Copyright Free 30 Best Ambient Nature || Cinematic Sound Effects

 Best copyright-free ambient nature cinematic sound effects download for free and use it anywhere you want for major use in youtube, Vimeo, short film, wedding video, and any other commercial use it 


30 Best Ambient nature cinematic Sound 


30 Best Copyright Free Ambient Nature Cinematic Sound Effects 


Why Cinematic Sound Effects Use 

The First sound is the major impact puts in a video it gives the emotion of scenes, shows the reality of scenes, engages the audience retention toward films or video, creates suspense therefore cinematic sound more important in video

Using cinematic sound effects in a video the quality of sound matters more means sounds heard you sharp more audience caught with film or video

for instance, in Interstellar movie, a minute sound keeps the attachment to the character and scene space shot very quiet but the sound of character breath, voice, footstep, surrounding this is the part of the best filmmaking and additional value punched it 


Sound design is a hard process and time taking we need large expensive gears to record silent short video sounds and mainly the nature sound

 Nature sound in other websites takes a large charge amount. Nature sound not easily available for us lots of searches on the internet dozens of hours spent but we don't get a proper sound for video, for Instance, fire sound, Burning sound or more 


best copyright free ambient nature cinematic sound effect how important is it, but we use it in videos properly then looks how much turn video in a different manners 


In the Download pack which sound provide a list

  1. Fire sound
  2. Waterfall sound
  3. Beach water waves sound
  4. Wind Sound
  5. Small Stream Sound
  6. Thunder Sound
  7. Windy Forest Sound
  8. Owl Hooting sound
  9. Rain on the Roof Sound
  10. Wind in the Pine Tree Sound
  11. Walking In forest Sound 
  12. Walking in Snow Sound 
  13. Boating Sound
  14. Walking and flashing Water Sound
  15. Horse eating Grass Sound
  16. Forest at Night Sound 
  17. Rain Sound
  18. Water lapping Sound
  19. Spring day Forest Sound 
  20. Birds Sound 
  21. Cicadas Buzzing
  22. Hollow Wind Sound
  23. Warm Afternoon Sound
  24. Cold Evening
  25. Farm Morning with Sheep
  26. Crickets with road sound
  27. Crow Caw Sound 
  28. Human breathing In echo Space Sound
  29. Human breathing Running Sound
  30. Human breathing by a nose sound


Title of the document

30 Best copyright free Ambient nature cinematic sound effects

DOWNLOAD

How to Create Cinematic Professional Looking Footage Using Your Smartphone

 I'm gonna be talking about how to create cinematic professional-looking footage using just your smartphone 

 Achieve Cinematic Professional looking footage kinds of results with just your Smartphone it's not quite as simple as just whipping it out of your pocket and using the native camera app there are a few keys to improving your footage and making it look much more professional so I'm gonna go over 8 steps of how to create Cinematic professional-looking footage using just your Smartphone that I took to achieve the footage in a simple way 


How to Create Cinematic Professional Looking Footage using just your Smartphone 


8 tips shoot cinematic through your Mobile


Manual Camera App

step number one is to use a manual camera app this is huge because your phone has a bunch of auto settings turned on like auto exposure auto white balance autofocus auto stabilization and though these tools are great for a lot of applications they will often make your footage look more like home video footage rather than professional film footage the app that 

I use is called Filmic Pro which you can get for about $14.99 (Rupees 1085.99) off of the Playstore if you're buying for android and Apple phone but the price of the apple store is different don't how much are you check it our from your app store if you don't see in-app store then go on the official link of Filmic Pro


Filmic Pro


 as for Filmic Pro, it's not a perfect app and it's not gonna replace a DSLR but I think it's one of the best ones out there for the android app once you've downloaded your app you're gonna want to change a few settings to ensure the highest quality video footage which brings me to bitrate


Bitrate


Step number two, which is to change your bitrate the bitrate refers to how to compress your video footages and will affect the overall quality of your image-standard 4k video that shoots out of the native camera app is at 50 megabytes per second you have the option to double that to a hundred megabytes per second which will give you a cleaner higher-quality 4k video to put that into perspective all of DJI drones shoot at a maximum of 60 megabytes per second 


Filmic Pro Bitrate


essentially the higher the bit rate the higher quality of video you're gonna get 


Frame rate


Step number three is to change your frame rate android default frame rate is 30 frames per second and if you want that cinematic Hollywood film look you want to make sure you switch that to 24 frames per second 


For example footage, I actually shot at all the 30 frames per second but then made sure to convert it down to 24 frames per second in the post I did that on purpose because I wanted my footage to be slightly slowed down and have kind of that dreamy look and stunning cinematic Professional look with slow motion then you must to shot footage in the frame rate of 60 frames per second 


Audio Formate


step number four is to change the audio format by default Filmic Pro has your audio formats set to AIFF this format isn't supported by Premiere Pro CC so before you start shooting make sure to change the format to AAC and it will then be recognizable by Adobe software 


Filmic Pro Setting


step number five is undo all of your auto settings in the bottom left of the app

Filmic Pro setting Moderate Setting


 you have three icons your exposure your focus and your color temperature tools simply drag the exposure icon on your screen to whatever you want to expose for then click the matching icon in the bottom left to lock it in this will ensure that your camera isn't constantly changing exposures 

Filmic Pro Low Bios option 


while you're trying to shoot the same thing goes for the focus tool select what you want in focus and then lock it in with the color temperature tool aim your camera until you like the auto white balance that is chosen 

Filmic Pro temperature Option selection


and then lock it in if you want even more control over these three elements hold down each of these icons and it will give you further options to manually set your shutter speed and ISO for your exposure pull focus to a precise distance and dial in exact temperatures and tints now, of course,

Filmic Pro Shutter Locked Option


 you have to learn how to use manual settings but we're not going to talk in-depth in this article about but I have a library of another article at 


Stabilizer

Osmo Mobile Stablizer


moving on to step number six is to use a stabilizer I personally would recommend using the DJI Osmo Mobile which you can get for about three hundred dollars and will work as a 3-axis gimbal for super-smooth shots and moving the time-lapse rig and as a tripod getting steady moving shots is a huge part 2 creating cinematic footage.

osmo Mobile Stabilzer tilting 


 There are many options out there in different price ranges for buying stabilizers for your phone again I recommend the DJI Osmo mobile be aware though if you do use a stabilizer you need to make sure to turn off the auto stabilization within your Filmic Pro app or else it's going to give you some warping artifacts as those two stabilizing systems try to fight with each other 

Osmo Mobile horizotal stabilzation 


Multiple Focal Lenght


moving on to step number seven is to use multiple focal lengths most smartphones only have one (the iPhone 7 Plus actually has two lenses one at about 28 millimeters and the other at about 56 millimeters this gives you two different lens options for different scenarios to help tell your story you can easily switch between these two lenses in your Filmic Pro app by selecting the camera icon and choosing between wide and telephoto lenses)

for those who don't have multiple lenses on their phones and you want more options you can buy third-party lenses to stick on the front of your phone there's a lot of cheap options out there I've personally purchased some of those cheap options and I wouldn't recommend it it's a waste of money if you're going to get one I recommend getting a moment lens they have several options depending on the focal length you want but again if you want the versatility to help tell your story it's super important to have multiple focal Lenght


 Post-Production 


Post Production is Editing


 the final step is post-production now I won't go super into depth on this but color correction sound design aspect ratios editing all play big roles and helping you bring your footage to life 

 This my 8 steps of shooting cinematic footage using nothing but my smartphone using these steps is exactly how I achieve cinematic footage thanks for coming here you 


Best Tripod Trick For your Smartphone

 Hack you should know about the mobile camera while shooting some commercial shoot at home  B-roll shot, Slow-mo shot with your pet or child. Make an interesting video using these tips.


Tripod tricks 


I'm going to share a small trick with you that I have actually learned recently and have been using quite recently in my Instagram videos now the trick is to use a tripod as a slider now how do I do this and what are the tips to get better videos.

 I'm very excited hope you are too so without wasting any time let's get started the idea of the trick is to move your tripod to create slider-like movements.  A simple tripod and a camera mounted to it I use both my hands for creating these tripod movements I use my left hand for the movement and I use my right hand for actually controlling and stabilizing the movement so there are basically two kinds of movements 

One is simple and one is conflicts now what do I mean by that let me explain so basically they are actually four types of movements one is the sideways one is where you move forward or backward now this comes under the simple category where you just have to use one hand and other hand just for stabilizing but things starts to get interesting when you use both the hands for creating the movements so you understand what  I'm creating a circle of movement I am using both my hands I am holding both the legs of the tripod and I'm moving the tripod in the circular motion with the center being the third leg of the tripod and the advantage of the tripod is you get a lot of flexibility if you are using a slider you're stuck with a one wave motion but when you are using a tripod just with a little bit of practice you can actually get very interesting movements you can also combine these movements to make it look much more interesting one additional tip is if your mobile shoots slow motion try shooting in slow motion and then you can use speed ramping to make it look even more interesting I recomnded to you shot video at 120 fps and I used speed ramping and  the video looks slightly more interesting than a static shot with no movement

 so even though you don't have a slider you can still create very interesting looking videos, I hope you enjoyed the trick and you will use it in your videos 

Another Trick is that the tripod has three lags ok, puts the tripod on a soft cloth just stand on the cloth but some condition has to do these tricks the cloth you have taken for that the surface keeps it which must be a plane surface like a marble surface, therefore, the cloth with the tripod slide smoothly backward or forward. The tripod works as a DIY slider but while using these tricks no need slider or no waste of money.   

Pull the cloth slowly backward with a little bit and push forward slowly then create a video more interesting. Using this tricks cloth and with the tripod also turn it surrounding, half turn, right turn, left turn and apply your idea into it than film video as you like to film it.

Idea mine and creativity yours then see what magic happens.

Understand Landscape Photography

 I'm going to cover all the tips you need to know as beginners to take your landscape photography to the next level, will be long but definitely will be worth your time 


landscape photography

 The first thing is camera gear talking about any genre I feel the lenses matter more not that the cameras do not matter but lenses matter more for landscape photography I recommend two lenses one is a wide-angle and second a telephoto zoom lens a wide-angle lens because you get that wider field of view which allows you to capture more of the landscape the lens that I'm using is a 14 to 24 mm 2.8 I use a full-frame camera so the effective focal length is 14 mm but if you're using a crop sensor camera I will recommend to get the lens at about 10 to 11 mm wide so the effective focal length is around 15 to 16 mm the reason for using a telephoto lens in landscape photography is you get to zoom in and capture the smaller details of a wider landscape I use my 7200 mm a lot for landscape photography to get those tighter shots one more gear apart from cameras and lenses that are very important in landscape photography is a tripod when you're into landscape photography you're going to shoot in different conditions and a good tripod is a must-have. You don't invest in a cheap quality tripod because a tripod is something that's going to hold and support your camera gear and accidentally if anything happens it's going to cost you way more than a good quality tripod


Camera Setting:-


camera setting for landscape photography


The next point is camera settings for landscape photography I use two camera modes one is aperture priority and the second is manual mode let's going on about manual mode first, the first thing I decide is what aperture do I want to use most of the times I want everything to be in focus so I shoot at F8 or F10 for the particular image I shot two different images at f10 and f 2.8 with the focus on the thing that where I want to focus and I like the f 2.8 version it adds a bit of depth to the image.  I want to Sunstar I use a smaller aperture like F14 or F16 smaller the aperture more pronounced will be the Sunstar there are two issues with using a smaller aperture one if you have dust on the sensor it becomes more visible as you use a smaller aperture and two after a certain point which is known as the sweet spot of the lens the sharpness of the lens tends to reduce now If you want to know the sweet spot of your lens just research a bit on the internet and you will get all the information so technically even if at F16 you're getting more depth of field the image won't be as sharp as it would be at F10 or F8 the other two things left are shutter speed and iso what to decide first depends on the situation if there's some kind of motion and that motion is important then i will adjust the shutter speed first if the motion is not important I'll set my iso and then I'll set my shutter speed.


Camera Mode:-


Accordingly while adjusting the exposure doesn't rely on the display always relies on the histogram. The histogram is going to give you an accurate representation of the exposure you're about to capture make sure you don't overexpose the highlights because if you do that you cannot recover them in post-processing if you're shooting in good lighting conditions most probably during the day time and the shutter speed is not important you can also use aperture priority the shutter speed will be adjusted automatically by the camera and it saves you a lot of time and you can focus more on the composition that brings me to the next point.


Composition Rule:-

 Composition all the basic composition rules like symmetry rule of thirds leading lines everything is applicable in landscape photography the intention behind good composition should be to keep it as simple as you can so that the viewer understand what is the main subject and it is also pleasing to the eyes one tip to make your composition much more interesting is to use a foreground element adds more depth to the images but make sure it's not distracting is there to complement the rest of the composition and not distract you from the main subject one more tip is to place a human element in your landscape images the reason why this is a very good tip is one it adds interest and two it gives a sense of scale since you know the size of an average human being you get an idea of the scale of the overall landscape once you start studying and analyzing the composition of the images you will develop a sense of good composition.

composition
composition in photography


Understand more about Composition here are separate article on composition detail check out


 Planning:-


When it comes to landscape photography you're dealing with nature and obviously, you cannot control the climate but what you can do is plan before you go to shoot the question is what and how should you plan for landscape photography well that depends on the kind of images you're looking for the most important thing is the weather I check the cloud cover if I want to shoot stars I will prefer a low cloud cover percentage and will shoot mostly during no moon days wind also plays an important role if you want to shoot calm reflections you would prefer a less windy location on the other hand if you want movement in the clouds for a time-lapse or a long exposure you would prefer stronger vents you can use google maps too for doing a bit of research about a particular location. 


I see a ton of images before going to a location to get a better idea of what could I do differently when I reach that location doesn't matter how much you plan things are always not going to work out a hundred percent the way you have planned it but the probability of getting a good image increases when you spend extra efforts in planning your shoot one important factor for planning.


Lighting:-
 

lighting in photography


Is lighting most important thing about a photograph is light in landscape photography mostly we are dealing with natural light if the light is good it can make an ordinary location look extraordinary if the light is not good vice versa generally i don't prefer shooting much when the light is too harsh if the cloud cover percentage is high and it's overcast day the light will be softer and probably I'll shoot the whole day my favorite time of shooting is golden arm and blue are these are the times where you see a lot more colors and get those dramatic images in case of sunrise the blue hour happens first and then the golden arc in case of sunset is the exact opposite what i would recommend is research about the timing of sunrise and sunset of a particular location and reach that location one hour prior to it this way you get more time to explore the location and finalize a good composition once you're happy with the composition then you have to wait for the perfect light and take the image most of the times the best light will only be there for few minutes or even few seconds but since you have taken all the efforts before shooting you're going to get a great shot.


Filters:-


The next point is filters  talking about filters are something that you attach in front of the lens to achieve the desired effect some of the lenses also allow you to put the filter through an opening but it works in the same manner for landscape photography the two filters that I use is ND filter and a circular polarizer an ND filter is a dark piece of glass it is used for taking long exposures during daytime ND filters come in different types like for example suppose there are two ND filters ND4 and ND8, ND4 will reduce four stops of light and ND8 will reduce eight stops of light higher the number darker will be the glass for beginners I would recommend getting a ND 6 or ND 10 depending on your usage talking about circular polarizer this is completely different from an ND filter many people confuse it and they think it's the same but no they are completely different a circular polarizer is a filter which you can rotate and you can change the angle of the light and add or remove reflections. Sometimes I use the circular polarizer and ND filter simultaneously when I want the effect of both the filters


Post Processing:-


The last point is post-processing I have seen a lot of beginners over editing the images to make the images look dramatic the problem with that is the images lose their natural feel, set image  dramatic colors are vibrant but the images are natural at the same time and that is what you have to master one of the areas which you have to pay attention while editing landscape images is the border that separates the highlights and shadows if you over-edit the images you will see this artificial-looking line which is known as a halo that's something you have to avoid so the goal behind post processing the images, that is to make your images look better but also natural at the same time 

8 way to Shoot Video in Cheap Quality Camera Smartphone

 Cheap quality mobile is just a low-end pixel, they did not shoot a better quality video for a short film or youtube video

lots of limitations to cheap quality mobile but no option to switch on better quality mobile then don't worry here share some tips that come from my experience which help you lot some times it is influence quality whose never you understand it is cheap mobile quality shoot yes sound read well. 

increase camera quality


Some Tips have given below use it while shooting video:-


1]   lightning matter in the video which makes the pixel of the video you shoot sharpen what understood to you that if lightning makes the video clear to viewers, dark light affects video

quality when heavy dark in shoot means blurriness may demotivate you on shooting. this all lightning arrange to take care then video quality too better.

camera lightning 


2]   Avoid night shoot with cheap mobile in above tips abide. cheap mobile has not stabilization inbuilt, the outdoor shoot takes some video with hand final video come out on shaky video, lots of shakes has in the video if you ignore it, therefore, this problem fix in editing software but it is not easy all footage has shaky software did not file all problem itself, the software has some limitation. so please don't ignore shaky footage then what solution have to fix this problem, use gimble reduced shakiness of footage sharp video quality, smoothly shoot video with caring of mobile moving 

Handheld mobile using gimble or cheap tip is to use selfie stick like the image shown below.

selfie stick and tripod


3]   For steady video required tripod use into video shooting reasons is our footage not shaky, emerging quality in the footage. Some time uses a selfie stick for better stabilization. Footages of cheap mobile have not stable perfect as 

camera the ahead apply stabilization tool on your video editing software.

shoot without gimble


4]   Audio quality  matters more in filming video this include more value in the video but we have only mobile to use recording audio therefore use it,

I recommend you use a mic, for example, boya mic has a cheap prize or another mic like you use. Doesn't any  Mobile have the best audio quality? use mic otherwise mobile has best for video with audio perfect.

audio has lots of noise in the shooted video for that clear in editing software certain inbuilt preset remove it.

5]   Filming video in a professional way use composition rule in footage that makes it to see. video ratio keeps 16:9 with quality 720p because of cheap quality mobile.

cheap quality mobile needs to improve videography. take footage two times each and check it on time for shot better or not.

6]    hand-held filming if you don't have a gimble, tripod, selfie stick then more precautions take for filming the video. Filming video smoothly moved forward of backward with no  interpretation 

  7]    Cheap mobile has no auto adjustment of brightness. Filming video with a mobile camera adjusts brightness manually. keep our next point to related

8] Cheap camera mobile does not have perfect auto color adjustment features to solve this problem use an external app to adjust the color of mobile, for example, is filmi pro. FilmicPro (it is paid app download from the link) has a nice feature for adjustment of color of video and professional look to video


Run 10x Fast Adobe Premiere Pro CC On Slow Laptop


run 10x fast adobe premiere pro cc on slow laptop


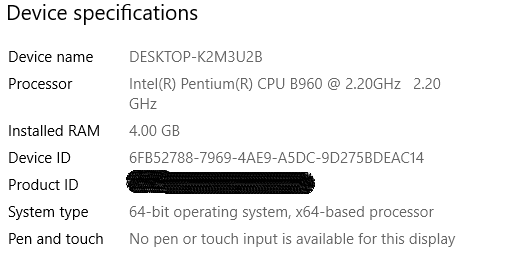
      When we use premiere pro cc in low laptop or desktop, for example, ram is 2Gb or for 4Gb graphics not good and mainly is that hard drive you well know that hard drive processing is not so good compared with a solid-state drive while you edit video in that type of laptop or computer then you face so many errors or hang below some problems you face with a slow laptop is discussed

  1.  lag while playing video 
  2. the color effect did not show properly  
  3. some effects did not play well 
  4. when some time show GPU required in the preview panel
  5. An important matter is that render time take an hours
  6. To time is taken for video exporting
  7. and so many things
The main point is that why this problem is facing while edit video in adobe premiere pro cc is that system requirement you understand it adobe premiere pro cc or version has at least requirement is 8GB ram, intel 6th gen processor or AMD FX hard drive space approximate 8GB and best is that SSD but for a beginner in the video editing profession we have no money or gears but we want to learn video editing anyhow don't worry here you come the right place for fast video editing in low laptop or computer, here share some best tips to you for video editing faster way, let us jump to tips you try your slow laptop or computer.

My laptop system has shared with you if I manage it so why can not try these tips and tricks

Run adobe in 4gb ram laptop


Focus on that point which shares here this point matter you, if you really want to be run faster adobe premiere pro cc slow laptop.

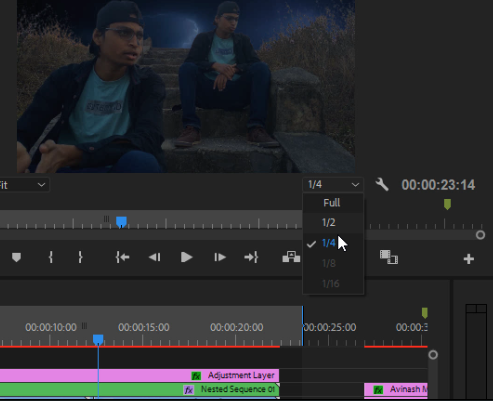
Tips first is that playback quality check if it is high then video play in lag means that played is leaves the frame and video effects not show you properly then the solution is that set it lowest value, for instance, is 1\2,1\4, 1\6, 1\8 last is 1\16. you see in the below image.

adobe premiere pro cc
playback quality in slow pc


if your video has to large-quality then you must encode it first and then you edit what I am saying that because if edit high-quality video in low pc then it slow because adobe premiere pro cc has background some coding running then high-quality video import in the timeline so definitely it runs slow solution is encode it first and with using third-party applications and then edit it, now you have arisen some question why it required that if video size has 1GB or less you need to reduce it approximately 100MB or up to 200MB you well-known size less pc run fast.


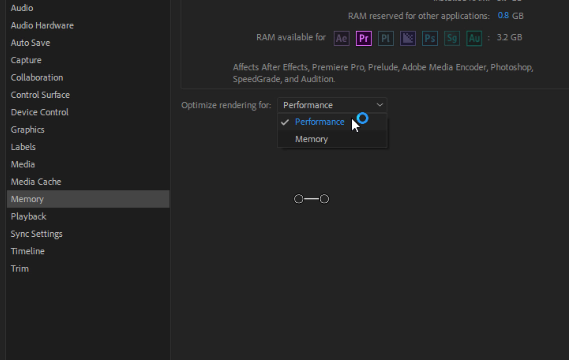
try to edit videos of 1080p and 720p quality video if you edit 4k video in slow pc so sure pc lag or sometimes crash. go in preference setting then click memory setting choose only performance don't choose memory, ok these tips help you lot


adobe premiere pro cc 2021
optimizing rendering setting in adobe premiere pro


It time to come on pro tips which are that upgrade your pc 2Gb to 4Gb, 4Gb to 8Gb, or more you have to do it, in my opinion, upgrade it to above 8Gb is enough but budget best is 16Gb. the real fact is that slow means slow no one you give money for upgrading and telling those things that I have shared with you.


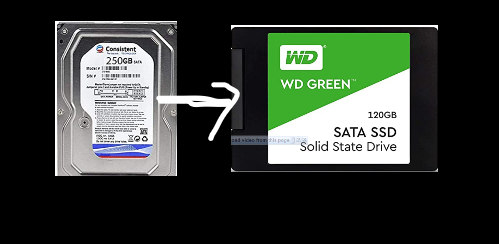
last tips for you upgrade hard drive to solid-state drive it is 10X faster than the hard drive bootup window and gaming, editing which you help more really trust me but it is very expensive if install SSD in slow laptop editing boost, laptop speed up    

hard drive to solid state drive
HHD to SSD 
Adobe premiere pro cc is a professional software for video editing if your skill upgrade on it then you become a professional video editor.

20 Free LUTs for Color Grading In Premiere Pro CC 2021

 20 free LUTs for video Editing your next project Every editor has to complete their work and then the final part has to finish which is color grading it is the most important part, you know that very well.


Color grading has improved your film and youtube video or any video that the main reason to take it better looks because of lightning, shades, the proper look of face our video/film to maintain.

If you are new to video Editing then tell you that Luts are ready to color grade on your film and video quickly that help you to save time. These luts are created by the professional colorist, therefore, we no need to spend time for a professional look at the footage.

Why is color grading is an essential part of video editing? footage never daw file which you shoot from either from mobile or camera shoot both footages has daw. Color grading telling you which film telling you a sensation emotion what exact meaning is telling emotion to viewers if the story of the '90s then color looks like the old, story is futuristic then color like new, cinematic soft.

Simple tips for color grading:

Mobile videography has low quality compared to  DLSR camera pixel low, blurriness in the footage. Mobile footage in night mode has so dark, impure, small dots in the footage. If you have a DLSR camera no dought you upload to where you want to but the mobile video has not to ready without coloring in it then done it as we want.

Tips are if you look minutely at your footages before coloring has faded in them. This fade kill footage color then we need to enhance it.

Black keeps it to  

Download 20 Adobe premiere pro cc luts


Best Camera angle || Understand to Audience

The camera angle in our filmmaking is best to look good but sometimes it not work because if your story doesn't understand to the audience then out work has no value. we really understand the camera angle which you influence the audience better knowing the storytelling of the cinematographer. 


Cinematographer expresses their story in a visual language which understands easily. which shot you covered in-camera as per the dialog in the script. Over the year cinematographer creates an understanding story behind the dialog.


camera angle
12 best camera angle 


Why Your camera angle is important in filmmaking:-


  1. Perspective
  2. Emotion
  3. Editing
  

Perspective:-


What you actually have seen in a short film to understand film multiple perspectives.
Emotion:-


Number two emotion different camera angles can help you convey different emotions.

Editing:-


 Editing your video becomes a lot easier when you have multiple angles to choose from which will ultimately help you tell a better story.
12 Camera Angle Here Discuss:-


  1. Wide shot:-


The wide shot is usually captured on a wider angle lens so as to see more of your surroundings and is more frequently used when you're wanting to establish a location so the viewer can understand where the scene is taking place wide shots can also be used to portray emotion like loneliness insignificance or feelings of being removed from the action.


2. Long Shot:-


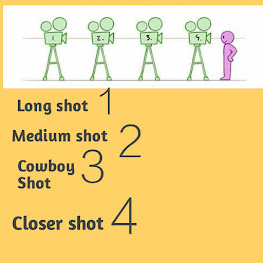
The long-shot is also used to establish location but with a bigger emphasis on your subject filling the entire frame usually showing their full-body this look is best created using a tighter focal length and shooting from a distance a medium shot is usually from the waist up and is used to help the viewer focus in on what your subject is doing or saying this shot is also great for helping the viewer feel.

long shot
camera long shot


3. Medium Shot:- 


What is the subject doing in that to show you through this camera angle? The medium shot most closely represents the distance you view people from as you're having a conversation with the cowboy shot this shot is discuss below.


4. cowboy shot:-


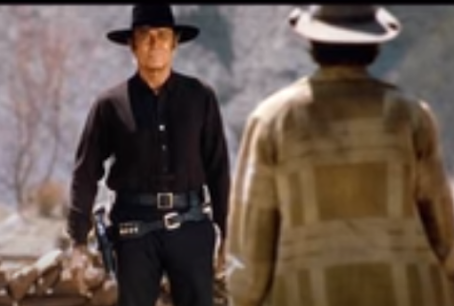
Cowboy shot is between long shot and medium shot its popular use in western films.

western cowboy shot
western film cowboy shot 


5. Tight (Close up) shot :


This shot mainly captures the subject face shot with the shoulder used mainly for dialogue or to show the detailed expression of your subject tighter shots are usually used for important or intense or intimate pieces of dialogue or action to help the viewer know that they should really pay attention to what's being said and tight shots are typically best shot on tighter focal links like around 50 to 100 millimeter.


6. Detail Extreme close up shot:-


A detail or extreme closeup shot is used to put emphasis or importance on a specific detail in your image detail shots are a great way to create mystery in-depth in a story to help draw the viewers attention to the common theme and again detail shots are typically best shot on tighter focal lengths like 50 to 100 millimeters or macro lenses.

Extreme closer shot
extreme closer shot

low angle , high angle, cowboy shot
camera position for different shot


7. Low Camera angle shot:-


The low camera angle is used to make your subject appear larger the life and to portray power and dominance low camera angles can also be made to portray Wonder and majesty as long as your subject is smaller than what surrounds them in your image. 

8. High camera angle shot:-


The high camera angle does the exact opposite by portraying your subject as weak and inferior or smaller and vulnerable.


Low, high, medium shot
low angle, high angle, and normal shot


9. Dutch Camera angle shot 


A Dutch angle is basically whenever you step on your frame and tend to be used to convey unpleasant movements like something that is not basically right to give the impression that the world is on the side of which the Dutch angles can be skillfully used to tell us something is wrong.


Dutch angle
Dutch angle 


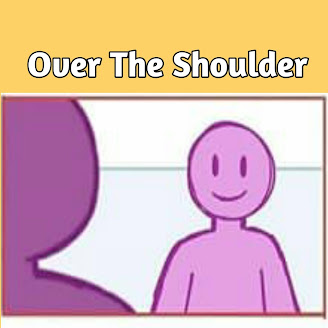
10. Over the shoulder shot:-


Over the shoulder, shots are exactly how they sound when you have two subjects talking to one another you put the camera behind the shoulder of one of the two placings one on the foreground giving the perspective as if you are the person that is being talked.

Over shoulder shot
conversation with a shoulder shot


11. Pov (point of view) shot:-


A POV or point of view shot depicts an angle that shows what a character is looking at this episode allows the viewer to take on the perspective of the character and begin to understand their state of mind on a more personal level this is commonly used in action or sports scenes to help give the audience the thrill of being in the driver's seat and is usually shot on a wide-angle lens so that you can see more of your surroundings.

pov shot
pov shot 


12. Cutaway shot:-


a cutaway shot is an interruption of a continuously filmed scene by inserting a view of something completely different cutaways are great to help transition to new scenes or to show side stories happening at the same time as you're the main story.


Some tips using camera angle:-


1. Be careful to use more camera angle isn't useful in every shot. 

2. Camera angle enhance your story in a better way 

3. Don't use unnecessary camera angle

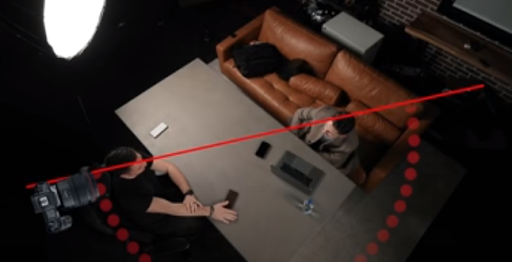
4.  The 180-degree rule is basically an invisible line that you draw in the middle of your scene and you have to make sure not to cross over the other side of that line

180 degree rule
180- degrees rule 


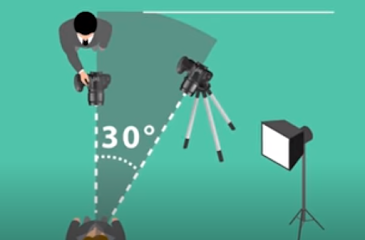
5. 30-degree rule which basically states that when cutting between two angles of the same subject like an interview of someone talking you want to make sure that our angle a and camera angle B are at least 30 degrees apart and ideally they'd also be a different type of angle like cutting from a medium shot straight in front of the subject to a tight shot by keeping this in mind it will help your angles cut together more seamlessly and professionally.

30 degree rule
30-degrees rule


 These are tips of using the camera angle you use in your story then tell me which camera angle you use most in your story?